Skip to content
When refreshing your home’s exterior, success begins long before the first coat of paint is applied. How well you prep a house for painting exterior surfaces determines how long the finish will last and how beautiful it will look.
Proper preparation, through cleaning, inspecting, and ensuring surface readiness, creates the foundation for strong paint adhesion and lasting protection. By giving attention to these early steps, homeowners can achieve a smooth, durable finish that enhances both the appearance and resilience of their home’s exterior painting project. Here’s what you need to know about the steps to prep a house for exterior painting.
Why Prepping Your House Matters
Prepping before an exterior house painting is more than just a preliminary task, it’s the foundation of a successful, long-lasting finish. Skipping or rushing this stage can compromise both the look and durability of your project. Taking preparation seriously ensures your investment pays off in beauty, protection, and value. Here’s why it matters:

- Better adhesion: Paint bonds more effectively to a properly prepared surface.
- Enhanced durability: Reduces risks of peeling, cracking, or fading over time.
- Moisture protection: Helps seal vulnerable areas and prevent water damage.
- Improved appearance: Creates a smoother, more polished final finish.
- Long term savings: Prevents costly repairs and extends the life of your paint job.
Whether hiring professionals or painting yourself, thorough prep is the key to lasting results.
Step by Step Guide to prep a house for exterior painting
Preparing your house for exterior painting involves several essential steps. You’ll start by inspecting and repairing any damage, then proceed to thoroughly clean the surfaces. Let’s break down each step to guarantee your painting project goes smoothly.
Step 1 – Inspect and Repair the Exterior
Before painting, carefully inspect your home’s exterior for cracks, peeling paint, or damaged siding. Pay close attention to windows and doors, checking for gaps, rot, or weakened wood. Addressing these issues early, whether through caulking, patching, or replacing materials, creates a stable foundation for your paint.
Proper repairs not only improve appearance but also prevent future damage. Taking time now ensures a smoother process and helps your new paint last longer with fewer complications.
Step 2 – Clean the Surface Thoroughly
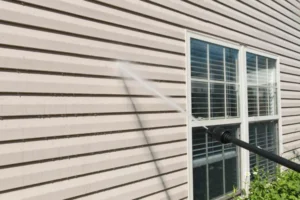
To achieve a flawless exterior paint job, cleaning the surface thoroughly is essential. Start by removing dirt, grime, and mildew using a pressure washer or a scrub brush with soapy water. Pay special attention to corners and crevices. Rinse the surfaces well and let them dry completely before moving on. A clean surface guarantees better paint adhesion and a longer lasting finish.
Step 3 – Scrape, Sand, and Remove Old Paint
After cleaning and drying the exterior, begin by scraping away any peeling or flaking paint with a sturdy paint scraper. Work carefully to expose the bare surface, paying attention to edges and corners where old paint often lingers.
Next, sand the area using medium grit sandpaper to smooth rough patches and blend transitions between bare wood and painted sections. Follow with fine grit sandpaper for a polished, even base.
Finally, remove all sanding dust and debris using a brush or vacuum. This thorough process eliminates imperfections, prevents bubbling or uneven texture, and ensures your fresh coat adheres properly, resulting in a smooth, professional quality finish that lasts.
Step 4 – Protect Windows, Doors, and Landscaping
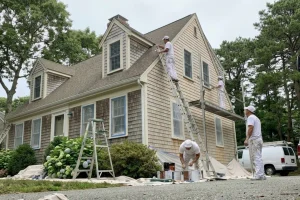
Before you start painting, it’s crucial to protect your windows, doors, and landscaping to avoid any damage or mess. Use painter’s tape to cover window edges and door frames, ensuring clean lines. Lay drop cloths or plastic sheeting over your landscaping to shield plants and soil from paint splatters. Taking these precautions will save you time and effort during cleanup later.
Step 5 – Prime Bare or Repaired Areas
After repairs and surface prep, apply primer to bare wood, exposed siding, or patched areas. A high quality exterior primer improves adhesion, seals porous surfaces, and creates a uniform base for your paint. Use a brush or roller for even coverage, paying special attention to repaired sections.
Allow the primer to dry fully before applying your topcoat. This step enhances durability, prevents stains from bleeding through, and ensures your final paint layer looks smooth, vibrant, and long lasting.
Step 6 – Check Weather and Timing
To prep the house for painting the exterior, it’s crucial to check the weather and timing to secure the best results. Aim for dry, mild conditions temperatures between 50°F and 85°F are ideal. Avoid painting during rain, strong winds, or extreme heat, as these can affect paint adhesion and drying time. Plan your project around the forecast to ensure a smooth and professional finish.
Special Considerations When Painting a Victorian Home
Victorian homes are architectural treasures, but their ornate details and historic materials demand extra care when painting. From intricate trim to delicate woodwork, preparation and technique are key to preserving character while achieving lasting results. Understanding these unique challenges ensures your exterior painting enhances both the beauty and value of your home. It will also ensure you know how to prep a house for exterior painting.
Touch on the extra prep required for intricate woodwork and multiple colors
Victorian homes often feature elaborate woodwork and multiple color schemes, making prep work essential for a successful paint job. You’ll want to carefully clean and sand all intricate surfaces to guarantee the paint adheres properly. Use painter’s tape to mask off different colors and protect adjacent surfaces. Take your time to plan out the color layout, guaranteeing a smooth and professional finish.
Discuss lead paint precautions in older homes
Many homes built before 1978 may contain lead based paint, which poses serious health risks, especially for children and pregnant women. Before you begin painting, test for lead with a certified kit or hire a professional. If lead is present, it’s essential to follow proper safety measures, like wearing masks and gloves, and ensuring proper containment of dust and debris during your prep and painting processes.
Recommend hiring experienced painters for historic properties
Hiring experienced painters for historic properties guarantees that the unique architectural details and materials preserved when painting home. These professionals understand the specific techniques and products needed to protect your home’s character. They’ll also be familiar with local regulations and historical accuracy, ensuring your home looks stunning while maintaining its historical integrity. Don’t compromise on quality. Trust the experts.
When to Hire a Professional House Painter

Deciding when to call in a professional house painter South Shore can significantly affect the quality and longevity of your exterior house painting job. If your project involves extensive surface repairs, hard to reach areas, or you simply lack the time and expertise, hiring an experienced painter is the smartest choice.
Professionals bring specialized tools, proven techniques, and efficiency that DIY efforts often can’t match. Beyond achieving a flawless finish, they ensure your home is adequately protected against weather and wear. Trusting an expert helps safeguard your investment while keeping your home looking beautiful for years to come.
Final Thoughts on how to prep a house for exterior painting
Taking the time to properly prep a house for painting the exterior makes all the difference in the final outcome. Careful cleaning, scraping, repairing, and priming of each surface ensure a smooth, durable finish that withstands the elements. Good preparation helps paint adhere evenly and last longer, keeping your home looking fresh and well protected. With the right approach and attention to detail, your exterior painting project can transform your home’s appearance and significantly enhance its curb appeal. Happy painting!
Enhance curb appeal with exterior home painting completed by skilled local painting pros. When exploring how to paint a home, proper preparation, quality materials, and expert techniques make all the difference. For reliable home painting in the local area, choose professionals who deliver long lasting finishes and elevate your home’s overall beauty and value.
Let our expert house painters on the South Shore handle everything — from prep to the final coat.
Frequently Asked Questions
1. What Type of Paint Is Best for Exterior Surfaces?
When selecting paint for exterior surfaces, opt for a durable, weather resistant option. Acrylic latex paint’s flexibility and adhesion make it ideal, while oil based paints offer excellent durability. Consider your climate and surface type for the best results.
2. How Long Does Exterior Paint Typically Last?
Exterior paint typically lasts between five to ten years, depending on factors like weather conditions and surface preparation. You’ll want to inspect and maintain it regularly to guarantee it stays in good condition longer.
3. Can I Paint in Cold or Rainy Weather?
You should avoid painting in cold or rainy weather. Low temperatures and moisture can prevent the paint from adhering properly, leading to peeling or uneven finishes. Wait for ideal conditions to guarantee your project’s success.
4. What Tools Do I Need for Prepping My House?
You’ll need a pressure washer, scraper, sandpaper, painter’s tape, drop cloths, and brushes. These tools make your prep work easier and guarantee a smooth, clean surface for your painting project. Don’t forget safety gear too!
5. How Can I Tell if My Siding Needs Repair?
You can tell if your siding needs repair by checking for cracks, warped boards, or peeling paint. Also, look for water stains or mold, as these can indicate underlying damage that needs immediate attention.